Vegan Blueberry Peach Almond Crisp

I seriously love summer. The weather is warmer, the days are longer, and the produce is fresh and abundant. I have been so busy enjoying the beautiful weather, time with loved ones, long walks with Bodhi, deepening my yoga practice, planning a trip and just taking some much needed time for reflection and developing an intentional lifestyle. I’ve been trying to make self-care and meditation a habit that will continue once work starts again.

But back to summer produce. I literally wait in anticipation for fruit and berry season, especially for peaches. There seems to be a very brief window in the summertime when peaches are at their best and I think I found that window this week. The batch of organic peaches I bought were just perfect. Peaches are always on the EWG’s Dirty Dozen list so I always buy organic.

OLYMPUS DIGITAL CAMERA

Unfortunately, since it’s been so hot in Toronto the last few days, the slight bumps and bruises on these peaches started to brown quickly and I knew they would go bad within a day. I figured instead of scarfing down 4 peaches in one sitting, I’d make a peach crisp.

OLYMPUS DIGITAL CAMERA

Bruised peaches can still be transformed into a crisp!

Why you will love this:

  • it’s naturally sweetened from the fruit (there’s only 2 tbsp. of additional coconut sugar!)
  • the almond extract offers a layer of sophistication to this dessert
  • you can have leftovers for breakfast the next day
  • it’s versatile – you can pair it with other stone fruit or berries\
  • it takes only 10 minutes to prep (45 minutes to bake – but set a timer and read a book while you wait!)
  • you don’t need to peel the peaches or cut off the light bruises unless you want to (it’ll all get cooked down anyway)

I hope you enjoy it and comment below and let me know if you have any other ways you like to use fruit that’s gone a little past its prime!

xo

Mira

Blueberry Peach Almond Crisp (serves 6-8 people)

Ingredients:

For the filling:

  • 4 organic peaches
  • 1.5 cups frozen (or fresh) blueberries
  • 1.5 tsp. organic almond extract

For the topping:

  • 1 cup organic large flake oats
  • 1/4 cup almond meal
  • 1/4 cup oat flour
  • 1/2 cup almonds, roughly chopped
  • 2 tbsp. coconut sugar
  • 4 tbsp. coconut oil, melted

How to Make It:

  1. Wash and dry the peaches. Cut peaches in half, remove the pit and slice into sections about 1/2″ wide and place them in your casserole dish as you cut them. Do not worry about peeling them if they are organic. Make your life easier.
  2. Add your washed blueberries to your dish. Top with the almond extract and stir the fruit.
  3. In a separate bowl, mix together the dry topping ingredients. Then drizzle in the coconut oil and mix until combined.
  4. Crumble the topping over the fruit and bake in a preheated oven for 40-45 minutes until the top is browned and the fruit is bubbly.
  5. Let cool slightly before serving. Serve warm with vegan ice cream if desired. It also makes an amazing breakfast so don’t be shy to have leftovers the next morning with some Greek yogurt!


Four-Ingredient Vegan Chocolate Peanut Butter Banana Ice Cream

So yesterday was #NationalIceCreamDay and of course I had to celebrate. Luckily I already had some frozen bananas in my freezer (I always add them to smoothies), so I was in a perfect position to make banana “nice cream.”

Most people are probably aware of how frozen bananas can be magically whipped up into amazing soft serve, but in case you aren’t – they can! So you have no excuse not to try this since it only requires four ingredients and takes seconds to make! If you want to get very fundamental with this recipe, you could just whip up the bananas in your food processor or blender and call it a day.

OLYMPUS DIGITAL CAMERA

If you follow me on Instagram, you know how much I love Luna and Larry’s Coconut Ice Cream. Their stuff is seriously amazing. And dangerously addictive. Especially their chocolate peanut butter flavour. But I’ll be honest. It’s darn expensive.

So I decided to try making it myself using a banana base and fall back on one of my favourite flavours from my Nutty Chocolate Monkey Smoothie. Banana, peanut butter and chocolate. You really can’t go wrong with any of those flavours in any combination (well, unless you have allergies, in which case please feel free to substitute another nut/seed butter of your choice).

If you decide to freeze leftovers, know that it will harden and not have the soft consistency of soft serve. You could re-blend it, or simply let it thaw slightly before scooping it out, or an even better option is to pour the leftovers in a popsicle mould. But honestly, I’d be surprised if there were any leftovers. They are that good.

I hope you enjoy this super delicious and simple recipe and let me know if you try it! See you next week!

xo

Mira

Vegan Chocolate Peanut Butter Banana Ice Cream (makes 2 servings)

Ingredients:

  • 3-4 frozen bananas
  • 2-3 tbsp. raw organic cacao
  • 2-3 tbsp. organic crunchy or smooth peanut butter (can sub any nut butter you like here)
  • 2 tbsp. vegan mini chocolate chips (I used Enjoy Life)

Instructions:

  1. Place frozen bananas, cacao and peanut butter in a food processor or high-speed blender. You can reserve a tablespoon of peanut butter to swirl in after.OLYMPUS DIGITAL CAMERA
  2. Use the ice cream setting on your blender, or run food processor until bananas are whipped smooth.OLYMPUS DIGITAL CAMERA
  3. Spoon out into bowls (swirl in peanut butter here if you opted to do that) and serve immediately topped with the chocolate chips, or into another glass container to be frozen for later (if there’s any left!).OLYMPUS DIGITAL CAMERA


Rainbow Quinoa Salad

The 80s are suddenly cool again and I’m digging the throwbacks to Jem and the Holograms, Care Bears, My Little Pony and  everything rainbow. Rainbow Bright. Reading Rainbow. Rainbow sweaters and leg warmers. Aaaaah memories. 🙂

But the food in the 80s, I have to say, was not so great. From what I remember from commercials, it was a lot of Cheez Whiz, sugary food-dyed cereal and Wonder bread. Enter my Rainbow Quinoa Salad to save yourself from processed woes.

I’ve made variations of this salad multiple times with rave reviews. It’s a great salad to bring to a potluck or picnic, or to make for a family BBQ. It feeds a crowd and is a great hearty vegan option for those that don’t eat meat. I brought this salad to our family BBQ celebrating my niece’s birthday recently and it was a hit!

OLYMPUS DIGITAL CAMERA

It’s got the full spectrum of colours going on and you can add even more veggies if you like, like corn or another bean if you wish. The possibilities are endless with this salad and it’s so easy to customize with whatever vegetables you prefer. It makes great leftovers for lunch the next day as well.

As we all know, the more colour packed into our meals (from natural sources of course, not chemical food dyes) the more nutrition and vitamins. So you can be certain that this salad not only provides you with good dose of protein, fats and carbs, but also the phytonutrients and antioxidants you need to stay vibrant and healthy all summer!

I hope you enjoy this recipe and I’ll see you next time!

xo

Mira

OLYMPUS DIGITAL CAMERA


Rainbow Quinoa Salad (serves 6-8 as a side)

Ingredients:

For the salad:

  • 1.5 cups organic quinoa
  • 1-2 organic carrots, finely diced
  • 3 organic green onions, finely chopped
  • 1.5 cups red cabbage, finely chopped
  • 1 small or half large organic red bell pepper, finely diced
  • 1 can (or 1.5 cups) organic canned (BPA-free) chickpeas, drained
  • 1/2 cup organic cilantro/parsley, finely chopped

For the dressing:

  • 2/3 cup olive oil
  • 1/3 cup freshly squeezed lemon juice
  • zest of one organic lemon
  • 1 tbsp. dijon mustard
  • 1 tbsp. raw honey
  • pink Himalayan salt and pepper to taste

Method:

  1. Rinse quinoa well and add to 1.5 cups boiling water. Cover and reduce the heat to a simmer and let cook for 12 minutes. Turn off the heat and allow the pot to remain on the element for at least 15 minutes to finish cooking.
  2. In the meantime, prep your vegetables by washing and chopping them.
  3. Make the salad dressing by adding all the ingredients to a mason jar, screw on the lid and shake it up!
  4. Allow the quinoa to cool to room temperature, add the vegetables and beans, then dress with the salad dressing and toss to mix. Cover and keep in the refrigerator until ready to serve.

Raw Vegan Zucchini Noodle Pad Thai

Yes. You read that right. Everything in this salad is raw. Noodles and veggies. And that’s because the noodles ARE vegetables.

I am seriously loving my spiralizer now that the weather has become too hot to cook in Toronto. You’ve probably seen how this very cool device can make vegetable noodles out of zucchini, carrots or even sweet potato. It’s pretty amazing.

OLYMPUS DIGITAL CAMERA
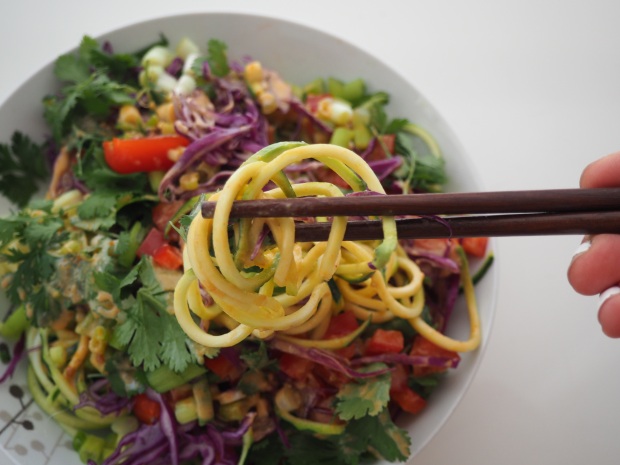
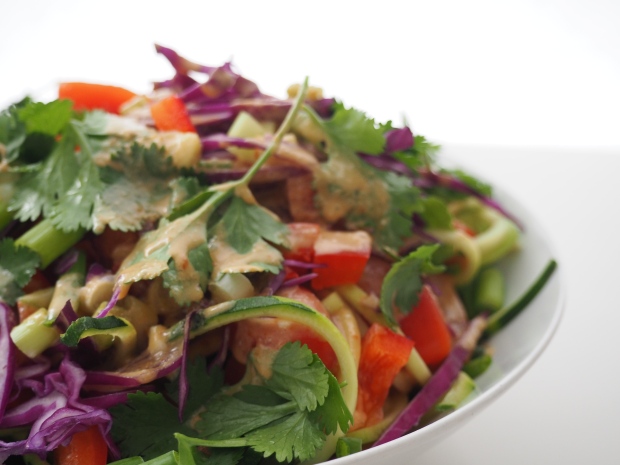
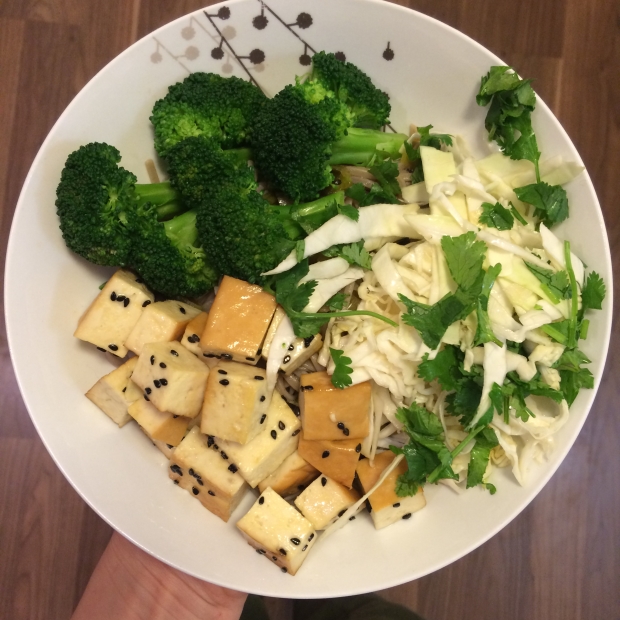
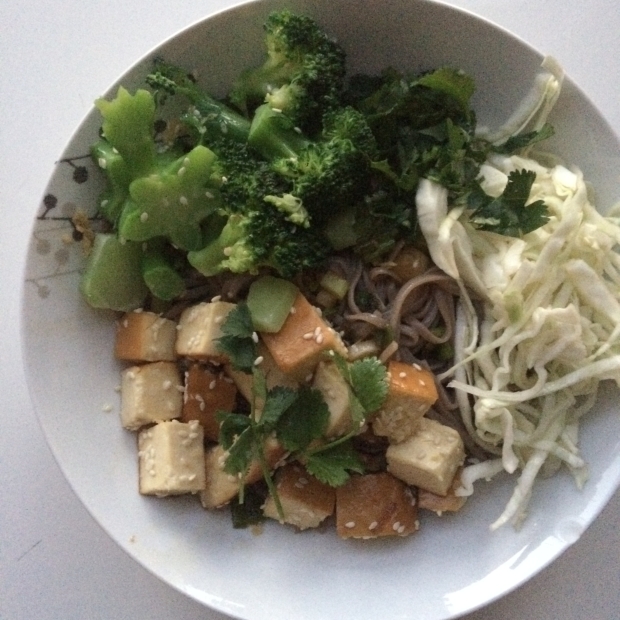
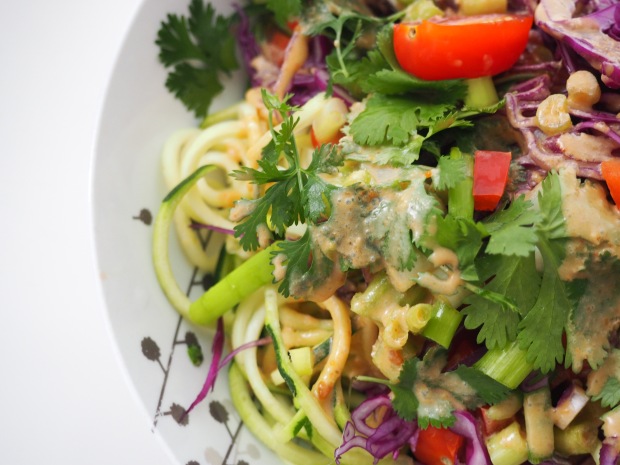
The best part is that these noodles are low calorie, don’t require cooking (or can be quickly blanched in a fraction of the time as traditional pasta), are gluten-free and contain more vitamins and minerals. Pair that with all the other raw veggies in this salad and you are getting some serious nutrition in your body! The best part is that it doesn’t taste healthy at all thanks to the delicious creamy dressing, which thankfully makes more than you need for this recipe so you can enjoy it throughout the week on other salads. If you are allergic to peanuts, you can try substituting almond butter for the peanut butter in the dressing.

OLYMPUS DIGITAL CAMERA

This salad is refreshing, crunchy, nutty, sweet and satisfying and perfect for those on vegan, paleo, gluten-free, dairy-free, detox, (insert your diet here) diets.

Or for any regular person who just wants a really killer salad.

I hope you enjoy it! Let me know what you think in the comments below, I’d love to hear from you. Stay tuned for more meals that are perfect for summer weather in upcoming posts!

xo

Mira

Raw Vegan Zucchini Noodle Pad Thai (serves 2 – inspired by Super Fresh)

Ingredients:

For the salad:

  • 1 medium/large organic zucchini, spiralized* into noodles
  • 1/4 cup organic red bell pepper, diced
  • 1/2 cup red cabbage, thinly sliced
  • 3 organic green onions, thinly sliced
  • 8-10 organic grape tomatoes, halved
  • 1/2 cup organic cilantro, chopped
  • optional add-ins: diced cucumber, bean sprouts, microgreens, grilled tofu, shredded carrots

For the dressing:

  • 1/4 cup organic peanut butter
  • 1 cup full-fat or low fat canned coconut milk
  • 2-3 tbsp. maple syrup (not raw, but you can add another alternative)
  • 1/4 cup gluten-free tamari
  • 1 tbsp. minced ginger (I used a microplane)
  • 1 tsp. Thai Kitchen red curry paste
  • water to thin out the dressing

Method:

  1. Wash all veggies and prep them for the salad. Divide the zucchini noodles and all other veggies evenly between the two bowls.
  2. If the coconut milk has separated, mix well before using it in this recipe and freeze the rest for other recipes later. Mix all the dressing ingredients in a glass mason jar. Put the lid on and shake it up. Add a little bit of water to thin it out to the desired consistency.
  3. Pour dressing over salad  and reserve the rest in the jar to use with other salads throughout the week.
  4. Enjoy the salads immediately (ideally on a patio with sunshine).

P1010072.JPG


Lemon Asparagus Sprouted Risotto

Nothing says spring like lemon and asparagus and both are paired deliciously in this simple vegan dish. Being a busy time of year for me, with report cards and graduation preparations needed, I’ll be leaning on my tried and true recipes that require minimal prep but make great leftovers. Hence this risotto – and the lack of a long pre-amble leading to the recipe.

Suffice to say that it’s delicious, gluten-free, vegan and full of fibre and protein thanks to the sprouted goodness in the risotto mix made by Organic Traditions which contains sprouted flax seed, lentils and brown rice. It’s seriously delicious.

P1010065.JPG

If you liked this recipe, or are looking for another type of risotto, check out my Beet Risotto or Sprouted Brown Rice Risotto with Lemon and Zucchini. Since I’m currently on an elimination diet that avoids soy, gluten, dairy and eggs, I’m subbing in nutritional yeast for that cheesy parmesan flavour. Feel free to sub in real parmesan, or your own favourite vegan parm if you have any.

And I’ll be enjoying leftovers while I attempt to survive the next few weeks. 🙂

xo

Mira

P1010063.JPG

Lemon Asparagus Sprouted Risotto

Ingredients:

  • 1 cup Organic Traditions Sprouted Risotto Mix
  • 1.5 cups vegetable stock or water + 1 tbsp. Herbamare
  • 1-2 tbsp. of extra virgin olive oil (I used Acropolis Organics)
  • 2 cloves garlic, minced
  • 1-2 shallots or 1 small red onion, finely diced
  • 1 lb. asparagus, trimmed of woody stalks at the bottom
  • 1/2 cup organic white wine (or red if that’s all you got)
  • 1 tbsp. nutritional yeast
  • zest of one organic lemon
  • 1/8 cup of chives, minced
  • pink Himalyan salt and pepper, to taste

Method:

  1. Bring the stock/water + Herbamare to a boil. Add the risotto mix, cover and simmer for 35 minutes. Let sit on the element for 10 minutes before using.
  2. In the meantime, clean and prep the vegetables. Chop the asparagus into about 2″ lengths, separating the stalks from the tips. In a large fry pan, heat the olive oil over medium heat.
  3. Add the shallots and onion and saute a few minutes until softened. Add the garlic and saute for another minute.
  4. Add the stalky parts of the asparagus to the pan along with some salt. Saute them for 2-3 minutes until bright green, then add the asparagus tips and saute another minute.
  5. Add the wine and cook off the alcohol for about 2 minutes.
  6. Add the cooked risotto mix to your asparagus mixture. Stir for a minute, then turn off the heat and add the nutritional yeast, zest of lemon and half the chives. Add salt and pepper to taste.
  7. Divide up the mixture into bowls and sprinkle with additional nutritional yeast, lemon zest and chives. Add more salt and pepper if desired and serve immediately.

Creamy and Energizing Mocha “Coffee” Latte Alternative

Are you currently on a spring detox and or have to avoid coffee? Fear not! I have a delicious solution to your coffee woes.

Personally, I was never a hardcore coffee drinker, but I always loved the smell and flavour of it in foods. No offense to Tim Horton’s, but it wasn’t until my trips to Europe in my early twenties when I fell in love with cappuccinos and dark rich coffee. They just know how to make coffee over there. But even now, I avoid drinking it regularly as I do notice the caffeine can make me jittery.

OLYMPUS DIGITAL CAMERA

So what’s a girl to do? That was when I discovered Dandy Blend at a local trade show a few years ago and recently started preparing it with coconut oil which gives it this lovely thick foam. This drink is creamy, roasted and chocolatey and while it doesn’t taste exactly like coffee, it’s a great energizing alternative and doesn’t give you the jitters. In fact, instead of draining your adrenal glands (the organs that are responsible for our “fight or flight” response by releasing stress hormones like cortisol and epinephrine), it nourishes your liver and kidneys. The bonus? It tastes amazing and has health benefits too!

OLYMPUS DIGITAL CAMERA

Benefits:

  • Dandy Blend:  roasted dandelion and chicory root tastes naturally sweet, helps support liver and kidney function
  • Cinnamon: balances blood sugar levels (prevents insulin spikes)
  • Raw Cacao: source of magnesium and antioxidants
  • Raw Honey: an anti-bacterial immune system booster, can aid in managing seasonal allergies
  • Raw Coconut Oil: anti-inflammatory, source of MCT (medium-chain triglycerides) which have been
  • Maca: an energizing adaptogen and hormone-stabilizer (consult your health care practitioner before taking)

If you try this recipe and enjoy it, feel free to say “Thanks a latte” down below! 😉

See you next week!

xo

Mira

Mocha


Mocha “Coffee” Latte Alternative (serves 1)

Ingredients:

  • 1-2 cups filtered hot water
  • splash of your choice of non-dairy milk
  • 1 tbsp. Dandy Blend
  • 1 tbsp. raw cacao powder
  • 1 tbsp. coconut oil
  • 1/2 tsp. organic cinnamon
  • 1 tsp. raw honey
  • 1/2 tsp. maca (feel free to omit this)

Method:

  1. Place the powders at the bottom of a high-speed blender.
  2. Add the non-dairy milk and hot water.
  3. Then add the honey and coconut oil. Blend at high speed until foamy (about 20 seconds).
  4. Pour immediately into your favourite mug and enjoy!

Energizing Green Smoothie

Green smoothies are a staple in my food rotation (especially now that Toronto has suddenly embraced summer weather – hurray!) so I honestly don’t know why it’s taken me this long to post a recipe for it. I think it’s because I assume there’s a zillion recipes out there for green smoothies, so why post another. However, after blending probably close to a thousand smoothies, I think it’s fair to say that not all smoothies are created equal.

OLYMPUS DIGITAL CAMERA


So what makes a good green smoothie?

  1. It’s cold. Harsh “greeny” flavours are muted when food is chilled, so use frozen fruit.
  2. Creaminess. Avocado adds a beautiful creaminess that is reminiscent of milkshakes and ice cream which appeals to the masses.
  3. Blending the greens well. A good blender should take good care of chewing up a lot of the fibrous bits, but if yours doesn’t handle kale well, stick to baby spinach which should easily break down.
  4. Cinnamon. Adding a dash adds depth to your smoothie and not only has a natural “sweet” taste but also balances your blood sugar levels.
  5. It doesn’t look muddy. If you’re all about the aesthetics, don’t throw any fruit/vegetable that’s not green or yellow in your smoothie unless you want it to turn brown. It’ll taste amazing, but it will look like swamp water. If this happens you can always add cacao powder to it but then you have crossed over into chocolate smoothie territory, and not to get technical, but your smoothie can no longer be categorized as “green”. (And yes, I am the smoothie police. :-b)

OLYMPUS DIGITAL CAMERA

The best part about smoothies is you can really customize them to your liking. I’ve provided a recipe base that you can use to experiment with various add-ins and toppings to create your perfect green smoothie or popsicles.

I encourage you to try making your own creations and leave me a comment below and let me know how they turned out or if you have other suggestions of things to add! I’d love to hear from you!

Stay tuned for another delicious drink recipe in my next post. This one will definitely appeal to coffee and hot chocolate lovers. Stay tuned!

xo

Mira

P1010077.JPG

Energizing Green Smoothie (serves 1 hungry person)

Ingredients:

Base:

  • 1 frozen banana
  • 1/2 small avocado
  • giant handful of organic baby spinach or kale
  • 2 cups non-dairy milk of your choice or chilled coconut water
  • generous dash of cinnamon

Additional add-ins if you’re a newbie:

  • 1 scoop vanilla protein powder (good for breakfast or post-workout recovery)
  • handful of medjool dates (if you’d like your smoothie to be sweeter or are making it for popsicles)
  • 1 tbsp. hemp seed or ground flax seed (for omega 3s, protein and fibre)
  • frozen pineapple or mango (for natural sweetness and a fruitier flavour)

Additional add-ins for the adventurous / seasoned smoothie connoisseur:

  • 1/2 tsp. maca powder (for energy and hormone balancing – omit if making for children)
  • 1 tsp. matcha powder (for energy and antioxidants)
  • raw sprouts (for a boost of vitamins and minerals)
  • 1 tbsp. E3 Live / 1 tsp. chlorella or spirulina powder (great for phytonutrients and detoxification)

Toppings:

  • fresh berries
  • cacao nibs
  • bee pollen
  • chia seeds
  • goji berries

Method:

  1. Place all desired ingredients and add-ins in a high speed blender (except toppings), starting with your frozen fruit, leafy greens and then lighter add-ins (powders/seeds). Lastly pour over the liquid of your choice.
  2. Blend for about 20 seconds until desired consistency is reached. Try to minimize blending for too long as heat generated and introduced oxygen can begin to break down some of the nutrients in your green smoothie. Add desired toppings.
  3. It’s recommended to drink it immediately, although you can refrigerate it for consumption later in the day. If freezing into popsicles, pour smoothie into a popsicle mould and freeze overnight.

OLYMPUS DIGITAL CAMERA

Tips to Prep for a Brunch

Happy Belated Mother’s Day to all the moms, mother’s-to-be and furmoms out there! I decided to show my mom some love with a brunch (which seems to have become a yearly tradition now) last Sunday. Brunch seems to be the meal en vogue, and I can see why when you get the best of both worlds!

And as fancy as brunch seems, hosting brunch does NOT have to be complicated or difficult and can easily be done with little effort. To be honest, it took more time to clean and tidy my place than it did to prepare the food! Here’s how to make it easy and stress-free (a.k.a. #brunchhacks):

OLYMPUS DIGITAL CAMERA

1) Make what you can in advance

Really this tip is good for any entertaining that you do. I like to strive for a mix of things I can make beforehand and things to make on the day of. Make any baked desserts ahead of time or if parts of a meal can be frozen in advance to help you out on the day certainly do that! I made the banana bread the day before. The only thing that I made on the day of were the frittatas, which took less than 10 minutes to assemble and less than 20 to bake.

OLYMPUS DIGITAL CAMERA


2) Purchase pre-made local artisan foods to make it special.

Not only do you not have to make said foods, if you picked them up from an area of the city where your guests don’t tend to visit or even know of, they will be delighted to try something new. A photographer friend of mine enlightened me of this Quebec brand of yogurt called Riviera on Instagram and I have been a fan ever since. I served their organic rhubarb yogurt that happen to come in adorable glass jars to up the fancy factor.

3) Make dishes that require assembly or no cooking.

Great options are fresh fruit (either cut up or whole), nuts and cheeses served on a wooden board or in pretty bowls. People can take nibbles of whatever they prefer. Salads are also a great option since you can purchase organic pre-washed greens, cut up fruit, add goat cheese, nuts and a simple dressing and it becomes restaurant-worthy.

P1010063.JPG

So what did I serve?

Mother’s Day Brunch Menu:

So while Mother’s Day has come and gone, there’s always Father’s Day to celebrate another brunch! I hope these tips will come in handy in June and I’ll be serving up another brunch for my dad then too.

To all mothers out there (especially mine!), thank you for all you do. Not just on Mother’s Day but everyday that you give of yourselves for your families. You are loved and appreciated. Love you mom!

See you all next week with another recipe post!

xo

Mira


Vegan Curried Singapore Rice Noodles

I’m going to be upfront by telling you that this recipe is my version inspired by Singapore noodles. If you’re a stickler for the real deal here, I’d encourage you to look elsewhere. However, this version puts up a pretty good fight on its own. 🙂

I had half a giant package of flat rice noodles when I experimented with making Pad Thai a few weeks ago and decided to use it to make this recipe. I had a craving for the curried noodles my mom would make when I was a kid, and although they probably weren’t authentic Singapore noodles, we all know there’s nothing like mom’s home cooking.

singapore noodles


The traditional version has a lot more meat (pork and shrimp) and not as many vegetables, so I modified this version so that it uses organic smoked tofu (to give it that really lovely “take-out” flavour) and more veggies. If you’re vegetarian, you can also add some fried egg to this dish too to help round out the protein. Curry powder and turmeric are powerful anti-inflammatory spices that have been known to assist with the symptoms of IBS, arthritis and cystic fibrosis as well as preventing cancer due to curcumin, the component that gives turmeric its distinctive colour.

If you’d like to include more of this anti-inflammatory superfood in your diet, check out my other recipes containing turmeric:

You can also search for any recipes containing curry since turmeric is a component in curry powder.

I hope you have a beautiful week and if you’re itching to celebrate with some Cinco de Mayo recipes check out my Mexican Black Bean Rice BowlRaw Vegan Taco Salad otBeat the Chills with Southwestern Chili!

xo

Mira

Vegan Curried Singapore Rice Noodles

Ingredients:

  • vermicelli (thin, angel hair type) rice noodles
  • 1 pkg. organic smoked tofu, cubed
  • 1 small red onion, sliced
  • 1 thumb length of ginger, grated (peeled if not organic)
  • 2 large garlic cloves, minced
  • 1 cup mushrooms, sliced
  • 2 carrots, sliced on a bias
  • handful of greens, chopped into strips (spinach, kale, swiss chard) (optional)
  • virgin coconut oil

For the seasoning:

  • 1 tbsp. curry powder
  • 1/2 tsp. turmeric
  • 2 tbsps. tamari
  • 2 tbsp. rice vinegar
  • 1 tbsp. maple syrup
  • 1-2 tsp. toasted sesame oil

To Garnish:

  • 2 green onions, sliced
  • 1/2 cup chopped cilantro

Method:

  1. Bring a large pan of water to a boil, add the noodles and cook for about 4-5 minutes, until just softened. Drain and rinse with cold water to prevent them from sticking together.
  2. Drain the noodles and heat the coconut oil in the pan. Saute the onion over medium low heat for a few minutes until softened. Then add the garlic and ginger and saute for a minute more.
  3. Add the mushrooms sauteing them until they cook down and begin to brown. Add the carrots and greens (if using) and saute until the greens have wilted slightly.
  4. Add the noodles and toss quickly with the veggies. Add the flavourings to the pan (you can mix them in a bowl in advance, but I was in a hurry and didn’t do that and it still turned out great!) and toss until everything is coated.
  5. Serve garnished with green onion and cilantro (not authentic) but I love everything with cilantro. #allthecilantro 😉

Smoked Tofu and Cabbage Slaw Noodles with Warm Sesame Dressing

I’ll be honest. I wasn’t going to share this recipe with you because the photos I had of this recipe well, quite frankly, sucked. Both times I made this was in the dead of winter in the evening when there was no natural light for decent photos. However, I decided that sharing this recipe with you was more important than the aesthetics of the images. Trust me. This is a good one.

I love making noodle bowls that remind me of ones I can get in restaurants (like Fresh in Toronto) since there’s a lot of versatility with what you can throw in it, but the base for me is always the sauce and the tofu. And this dish has does both really well.

noodle bowl 2

Smoked tofu really elevates this dish with more complex flavour so while it’s not the end of the world if you can’t find it, it really can make this meal really unique. And the sauce. Oh my. The sauce on the noodles here is a perfectly sweet and toasty which is perfectly contrasted with the tang from the slaw.

As usual, feel free to substitute in whatever vegetable you have: asparagus, cauliflower, swiss chard, baby spinach or kale would all be lovely here, but of course make it your own! You can also add some shredded carrots or beets to your slaw too if you have any.

noodle bowl 1

I hope you enjoy this healthy “fast food” version at home. Please let me know how you like it in the comments below! 🙂

xo Mira

Smoked Tofu and Cabbage Slaw Noodle Bowl (serves 2)

Ingredients:

For the bowl:

  • 1-2 cups broccoli trees or any other green veg of your choice
  • 1 package buckwheat noodles
  • coconut oil
  • 1 block of organic smoked tofu cut into 1 inch cubes
  • 1 tbsp. sesame seeds (white or black)

For the slaw:

  • 1-2 cups green or purple cabbage, finely shredded (you can also add shredded carrots or beets!)
  • 1 tbsp. rice vinegar
  • 1 tbsp. maple syrup
  • big pinch of pink Himalayan salt

For the dressing:

  • coconut oil
  • 4 green onions, finely chopped
  • 1 tbsp. sesame seeds (white or black)
  • 1 tbsp. rice vinegar
  • 2 tbsp. maple syrup
  • 1 tsp. toasted sesame oil
  • 1 tbsp. tamari
  • Juice of 1/2 lemon
  • 1 tbsp. toasted sesame seeds
  • 1/2 cup fresh cilantro, roughly chopped

Method:

  1. To make the slaw mix all the ingredients in a bowl. Mix it with your hands and then put aside.
  2. Using once pan for this dish, start with blanching your broccoli. Bring some water to a boil in the pan, place the broccoli in there and let them simmer for a few minutes until bright green but still have bite.
  3. Remove the broccoli and then with the pan still on the heat add your noodles and cook according to package directions (usually about 6-7 minutes) until al dente. Drain and rinse under cold water to prevent them from sticking together.
  4. Heat the pan and add the coconut oil. Once melted, add the tofu and let it crisp up on each side before tossing in sesame seeds and removing from the pan. If you’re in a hurry you can skip this step…it still tastes just as good.
  5. Using the same pan, add bit more coconut oil and fry the green onions for a minute on medium low. Then add the vinegar, maple syrup, sesame oil, tamari and lemon juice. Let cook down for about 20 seconds or so until the sauce thickens to a warm dressing.
  6. Add the cooked noodles to the pan and stir to coat in the dressing. Divide the noodles between two bowls and top each one with the pickled cabbage, half the tofu and broccoli, and a sprinkling of sesame seeds and cilantro. This makes great cold noodle leftovers so feel free to make extra to bring for lunch the next day. So delicious!